

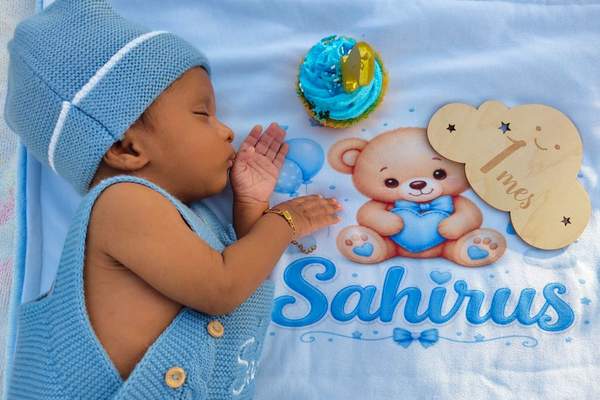
A baby milestone blanket makes monthly pictures look effortless, until a curious baby grabs the month marker, hides a printed number with one foot, or rolls out of the frame. The challenge isn’t finding more decorations. It’s creating a recognizable composition that keeps working as your baby grows.
These baby milestone blanket photo ideas focus on the details that make a real difference: the camera angle, readable numbers, gentle light, comfortable clothes, and a few personal touches. The aim is a set of monthly images that feel connected without making every session look identical.
Prepare a Repeatable Blanket Setup
Choose a baby growth blanket with lettering that’s easy to read from above. Bold numbers usually show up better in phone pictures than fine print. If the blanket has busy illustrations, dress your baby in something simple so the pattern doesn’t compete with their face.
Lay the blanket flat on a clean, firm part of the floor. Smooth out folds that bend the printed markings, and leave space to photograph its edges. A safe floor-level setup is easier to supervise than arranging an overhead shot on a bed or table.
Keep the camera in the same position
For traditional milestone blanket photos, take the picture from directly overhead with your phone parallel to the floor. Switch on the camera grid and align it with the blanket’s straight edge. Capture a wider reference photo each month so you can compare the framing next time.
If you crop the picture for social media, save the original too. As your baby gets taller, you may need a looser crop to keep their whole body and the month marker visible.
Creative Ideas That Keep the Month Visible
Use a simple signature outfit
A plain bodysuit or romper works beautifully against a patterned blanket. Choose the same color family each month, but let the size change naturally. Those longer sleeves and growing legs become part of the story.
Pick one clear month marker
A flat card or simple ring can draw attention to the correct number. Put it beside the print, rather than across your baby’s body. If the blanket doesn’t have numbers, position a month card in the same corner every time. Keep detachable pieces out of your baby’s reach.
Include one familiar comparison prop
A favorite plush toy photographed beside your baby can make growth easier to see. Keep it away from your baby’s face, supervise closely, and remove it right after the shot. You can skip props altogether if the blanket has a recognizable border.
Take a candid picture, too
After the straightforward overhead photo, capture a stretch, grin, or curious glance. The formal frame gives you twelve comparable monthly baby blanket pictures. The candid frame records the personality that comes with each age.
Add a restrained seasonal accent
Set a paper leaf near the blanket’s outer edge for autumn or a fabric flower for spring. Limit yourself to one small accent, safely away from your baby. The decoration should add context without obscuring the number.
Photograph tiny details afterward
Once the full scene is finished, capture toes, hands, or a new smile up close. These secondary images add variety to milestone mat photos while the main shot preserves the monthly comparison.
Solve Common Framing and Marker Problems
The biggest difference between a tidy blanket photo and a confusing one is usually marker placement. Check that the ring or card identifies only one number and doesn’t merge visually into the design. Step back and review a picture at normal phone-screen size: the month should be obvious immediately.
Suppose the six-month number sits directly beside your baby’s shoulder. Instead of moving your baby into an uncomfortable pose, rotate the blanket before the session so that number falls in an open area. Test the composition with a folded towel, then remove it before placing your baby down.
Don’t worry if older babies cover a little of the print. Keep the correct month marker readable and their face visible. A slightly imperfect frame still belongs in the series.
Use Window Light for Natural-Looking Photos
Spread the blanket near a window with bright, indirect daylight. Avoid strong sun streaks that make half the blanket bright and the other half dark. A sheer curtain can soften harsh shadows.
Photograph at roughly the same time of day when practical, and turn off ceiling lights if they add an orange color cast. Check that your own shadow isn’t covering the marker. Consistent light helps the fabric color look similar across twelve images.
Adjust as Your Baby Becomes More Mobile
In the early months, an awake, content baby may happily lie on their back long enough for several frames. Later, rolling, reaching, sitting, and crawling can change the plan completely. Prepare everything first, then take the main picture quickly rather than expecting a long session.
Have another adult stay within arm’s reach, especially when you’re holding a phone overhead. If your baby can sit independently, a separate sitting picture can be fun; don’t force a pose just to preserve the layout. Keep the setup on the floor and stop if your baby becomes upset.
A milestone blanket is a supervised photography backdrop, not a sleep surface. For naps and bedtime, infants need an appropriate firm, flat sleep space free of loose blankets, toys, and pillows.
Create a Monthly Routine That Takes Minutes
Store the blanket, month marker, and preferred outfit together. On photo day, spread the blanket, choose the correct number, check the light, and frame the empty setup before bringing your baby into the scene.
Take a few wide photographs and a couple of close expressions. Compare the crop with last month’s image, but don’t stretch or resize your baby to match their earlier proportions. Showing genuine changes in size is the whole point.
Save the full-resolution originals and select one image per month for a first-birthday collage. You can expand the album with newborn photo ideas at home, monthly baby photo themes, and milestone card photography inspiration.
Frequently Asked Questions
When should I begin milestone blanket pictures?
Start with a newborn picture or at one month, whenever your baby is comfortable and awake. A photo taken a few days after the monthly date still tells the story.
What clothes are best for blanket photos?
Soft, plain clothing usually photographs well. Choose colors that contrast with the blanket and avoid large graphics that compete with printed markers.
How do I keep the angle consistent?
Use the same blanket orientation and align your phone’s grid with its edges. Keep a wide reference picture from the previous month to compare.
What if my baby won’t lie still?
Make the setup ready before the session and photograph during a calm, awake moment. Accept a candid frame or try another day. Never restrain your baby for the picture.
Let Real Growth Lead the Story
The best milestone blanket photos balance consistency with personality. Keep the background familiar, the month readable, and the sessions short and safe. By the end of the first year, changing expressions, longer legs, and increasingly adventurous movements will make those simple pictures far more memorable than elaborate props ever could.
